Have you noticed dampness in your building and are wondering how to tackle it? Damp proof cream could be the solution you need. In this article, we will explore what damp proof cream is, why it is necessary, the causes of dampness in buildings, and how damp proof cream works.
We will also discuss the types of damp proof cream available, the tools and materials needed for injection, safety precautions to take, and step-by-step instructions for injecting the cream. Stay tuned to learn how long it takes for the cream to work and the aftercare steps to follow. Let’s dive in!

What is Damp Proof Cream?
Damp proof cream is a specialized solution used to prevent moisture penetration in walls, offering an effective barrier against dampness.
It is typically applied to masonry and brickwork to create a protective barrier that blocks moisture from seeping into the building structure. This cream acts as a safeguard against water ingress, preventing issues such as damp patches, mold growth, and structural damage caused by excess moisture. By forming a waterproof layer, the damp proof cream helps maintain the integrity of the walls and ensures long-term moisture prevention.

Why is Damp Proof Cream Necessary?
Damp proof cream is essential to combat rising damp issues and prevent the detrimental effects of dampness on walls.
Applying damp proof cream to affected areas creates a protective barrier that stops moisture from seeping through walls, thus preventing further structural damage. This cream works by penetrating deep into the masonry, forming a water-repellent layer that helps maintain the integrity of the building.
By addressing rising damp concerns promptly with the use of damp proof cream, you can safeguard your property from mold growth, rot, and other issues associated with dampness. It is a cost-effective solution that offers long-lasting protection for your walls.
What Causes Dampness in Buildings?
Dampness in buildings can stem from various sources, including moisture absorption through permeable surfaces and structural defects.
Moisture absorption can occur when materials like bricks, concrete, or wood come into contact with water, leading to water penetration through capillary action. Surface permeability issues, such as cracks in walls or gaps in windows and doors, can allow water to seep into the building. Structural defects, like faulty damp proof courses or poor ventilation, can also play a significant role in causing dampness.
Identifying and addressing these causes is crucial to preventing long-term damage and maintaining a healthy indoor environment.

How Does Damp Proof Cream Work?
Damp proof cream functions by creating a sealing barrier upon application, effectively preventing moisture penetration into walls.
This sealing barrier formed by the cream acts as a protective layer that stops moisture from seeping through porous surfaces.
The application process of the cream involves carefully following the manufacturer’s instructions, typically requiring the use of a trowel or brush to evenly spread the cream on the affected area.
Once applied, the cream dries and hardens to form a durable and long-lasting barrier against dampness. This innovative solution is popular for its efficiency in safeguarding buildings from the damaging effects of dampness and mold.
Find out more: Does Damp Proof Paint Stop Mould

What Are the Types of Damp Proof Cream?
Various types of damp proof creams exist, including injection-based solutions and penetrating formulations designed to address specific dampness issues.
- Injection-based damp proof creams are commonly utilized to combat rising dampness, where the cream is injected into the mortar bed joints along the base of walls.
- On the other hand, penetrating formulations are ideal for tackling penetrating dampness, as they are applied directly onto the affected surface.
Each type of damp proof cream offers a unique approach to moisture prevention, tailored to the specific needs of the property and the type of damp problem present.
Which Type of Damp Proof Cream is Best for Your Building?
Choosing the best type of damp proof cream for your building depends on factors such as wall construction, masonry materials, and the extent of damp issues.
When evaluating the wall composition, it is crucial to consider whether it is made of brick, stone, or concrete, as each material requires a different type of damp proof cream. The masonry characteristics, such as porosity and thickness, also play a significant role in determining the most effective solution. The severity of damp problems should not be overlooked, as this will impact the choice of cream needed to provide long-lasting protection. By carefully assessing these factors, you can select the most suitable damp proof cream for your masonry building.
What Tools and Materials Do You Need for Injecting Damp Proof Cream?
The process of injecting damp proof cream requires specific tools and materials such as a drill, injection pump, protective gloves, and the damp proof cream itself.
To effectively execute the injection process, you will need nozzle attachments compatible with the injection pump for the precise application of the cream. Safety goggles are vital to protect your eyes from any splashes during the procedure, while a sturdy ladder will assist you in accessing higher areas. Plastic sheeting and duct tape can be handy for protecting surrounding surfaces from potential spillage. Proper ventilation is crucial, so consider using a respirator to avoid inhaling fumes during the injecting process.

How to Prepare the Surface for Injection?
Preparing the surface for injection involves drilling holes at strategic intervals to ensure proper distribution of the damp proof cream within the walls.
- These holes are typically placed horizontally along the base of the wall and at regular vertical intervals to cover the entire affected area thoroughly. By strategically positioning these holes, the injection process allows the cream to penetrate deep into the masonry, creating a barrier against moisture ingress.
Prior to drilling, it is crucial to assess the wall’s construction material to determine the appropriate depth and angle for the holes. This meticulous preparation ensures the successful application of the damp proofing solution for long-lasting protection.
What Safety Precautions Should You Take?
Taking appropriate safety precautions is vital when injecting damp proof cream, necessitating the use of protective gear such as goggles, gloves, and suitable clothing.
Protective gear serves as a shield against potential health hazards posed by the chemicals in the damp proof cream. Goggles protect your eyes from splashes or fumes, while gloves shield your hands from direct contact with the substance. Wearing suitable clothing further minimizes skin exposure. Ensuring proper ventilation during the injection process is equally important to prevent inhaling harmful vapors. Prioritize safety by following manufacturer guidelines and consulting professionals if unsure about the application process to safeguard your well-being.
Steps for Injecting Damp Proof Cream
The process of injecting damp proof cream involves several sequential steps, starting with drilling holes into the affected area to facilitate the application.
Once the holes have been prepared, the next step is to carefully insert the damp proof cream cartridges into a specialized gun applicator. With the applicator in hand, the cream is then injected into each pre-drilled hole. After all the holes have been filled, any surface gaps are meticulously sealed to prevent moisture seepage. This thorough process ensures that the damp proof cream is effectively distributed throughout the targeted area, creating a barrier against future dampness.
Step 1: Drill Holes into the Affected Area
The initial step in the injection process is to carefully drill holes into the affected masonry area where the damp proof cream will be applied.
- Drilling these holes is a crucial task that requires precision and attention to detail. The holes should be strategically placed to ensure thorough coverage of the affected areas without causing any damage to the underlying structure. It is important to use the right tools and techniques to create clean, uniform holes that will allow the cream to penetrate effectively.
- By carefully planning the placement and depth of the drill holes, you can ensure that the damp proof cream is distributed evenly, providing long-lasting protection against moisture infiltration.

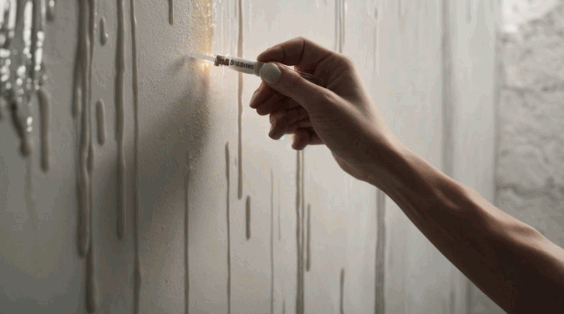
Step 2: Insert the Nozzle of the Damp Proof Cream Tube into the Holes
- Following hole drilling, the next step involves inserting the nozzle of the damp proof cream tube into the prepared holes for injection.
- This step is crucial as it ensures the proper distribution and penetration of the damp proof cream into the structure’s walls.
- To insert the nozzle correctly, gently push it into the hole until you feel slight resistance. Make sure the nozzle is securely in place to prevent any leakage during the injection process.
- Once all nozzles are inserted, you can begin applying the damp proof cream by slowly pressing the tube to release the product into the walls. This method helps create a barrier against moisture and dampness effectively.

Step 3: Inject the Cream into the Holes
- The third step requires injecting the damp proof cream into the pre-drilled holes, allowing for absorption and barrier formation within the walls.
This process involves using a high-quality injection gun to carefully insert the cream into each hole, ensuring an even distribution throughout the affected area. As the cream is injected, it penetrates deep into the wall structure, creating a protective barrier that effectively prevents the further passage of moisture. Proper technique is crucial during this step to ensure that the cream reaches all necessary areas and maximizes its effectiveness in damp proofing the walls.

Step 4: Fill Any Gaps or Cracks in the Surface
- In the final step, any gaps or cracks on the surface should be adequately filled and sealed using an appropriate sealant to enhance the effectiveness of the damp proofing treatment.
This process of filling gaps and cracks is crucial as it ensures that no moisture can penetrate through any remaining openings, thereby providing a thorough protective barrier against dampness. The sealant acts as a barrier, preventing water ingress and further deterioration of the surface. By meticulously sealing off all potential entry points, the overall integrity and longevity of the damp proofing treatment are significantly improved, contributing to a more resilient and durable surface that effectively resists moisture damage.
How Long Does it Take for the Damp Proof Cream to Work?
The duration for damp proof cream to take effect varies, with factors like drying time and borehole absorption impacting the overall effectiveness and timeline of the treatment.
Once the damp proof cream is applied, it typically requires some time to fully penetrate the walls and create a protective barrier against moisture. The work time can range from a few hours to a few days, depending on the specific product used and the depth of penetration required. Borehole absorption rates play a crucial role in how quickly the cream is absorbed into the substrate. Higher absorption rates may result in a faster overall treatment process, whereas lower absorption rates might extend the timeline for the cream to fully take effect.
What Are the Aftercare Steps for Injecting Damp Proof Cream?
After injecting damp proof cream, it is essential to follow specific aftercare steps, including regular maintenance and property checks to ensure long-term effectiveness.
This post-treatment care is crucial for the preservation of the applied damp proofing treatment. Regular maintenance tasks involve checking for any signs of water ingress or dampness and addressing any potential issues promptly to prevent further damage.
Property inspections should be carried out periodically to monitor the condition of walls and assess the need for the reapplication of damp proof cream. By staying proactive with aftercare and maintenance activities, you can prolong the protection provided by the damp proofing treatment and safeguard your property against future moisture-related problems.


