Epoxy flooring is a top choice for homeowners wanting to upgrade the looks and toughness of their floors. DIYing this project lets you create a glossy, unified finish that can change any room in your home. Whether it’s your garage, basement, or living room, this article will give you formal directions.
Before beginning, you need to make sure the surface is clean, level, and without cracks. This will help with adhesion and a better-looking outcome. Step one is applying primer to help the concrete or existing flooring stick to the epoxy resin.
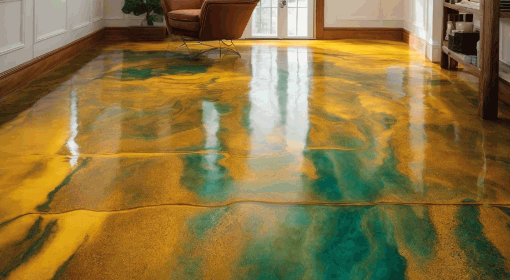
The fun part is next – applying the epoxy. Choose high-quality epoxy items that’ll fit your needs. From high-gloss to more subdued looks, there are tons of colors and textures to choose from. Stick to the manufacturer’s instructions for mixing and application techniques to get a professional finish.
Also, proper ventilation is key. Some epoxy products give off fumes that can be dangerous if breathed in a lot. So, make sure to work in an area with airflow or wear breathing protection.
Tip: To ward off air bubbles when installing, use a roller with a long handle. This will make sure the coverage is even and free of imperfections.
By following these steps and paying attention to detail, you can get amazing outcomes with DIY epoxy flooring. So, why wait? Change your floors today and reap the rewards of a beautiful, durable surface that’ll last.

Benefits of DIY Epoxy Flooring
Epoxy flooring is a hit amongst DIYers! It provides a long-lasting and durable finish, resisting scratches and stains. Plus, it’s cost-effective, no need to hire professionals. You can customize it with various colors and patterns, too. Applying epoxy yourself gives you full control.
You can save time and effort – no need to hire pros for installation. It’s flexible, so you can use it on concrete or wood floors. Low-maintenance, just clean with mild detergent.
Plus, it can transform any space into a visually stunning area. Create a glossy or matte finish, plus it’s resistant to fading from UV exposure. Upgrade your floors with DIY epoxy coating! Enjoy the satisfaction of customizing your living space – with endless possibilities! Start today!
Necessary Tools and Materials
DIY epoxy flooring? Must-have tools and materials! Here are the basics:
- Epoxy resin and hardener. Pick a high-quality product that suits you.
- Mixing container and stir stick. A plastic or metal container and a strong stir stick.
- Paint roller and tray. Apply epoxy evenly. Plus, the tray helps pour.
- Floor sander or grinder. To remove coatings, stains, and imperfections.
Safety tip: Wear protective gear like gloves, goggles, and a mask. Stay safe!

Preparing the Floor
To prepare your floor for seamless DIY epoxy flooring, start by thoroughly cleaning and decontaminating the surface. Next, tackle any cracks and holes to ensure a smooth application. By addressing these sub-sections diligently, you will lay a strong foundation for successful epoxy flooring installation.
Cleaning and Decontaminating the Surface
Cleaning and decontaminating the surface is a must for any activity. Eliminating dirt, germs, and contaminants creates a safe environment. Here’s a 5-step guide for cleaning and decontaminating:
- Assess the surface. Identify areas needing special attention.
- Remove debris. Use a broom, vacuum, or dust mop.
- Select a cleaner. Consider disinfectants or sanitizers.
- Apply the cleaner. Dilute and cover all areas.
- Agitate and rinse. Scrub if needed. Allow to dry.
Follow safety guidelines when handling chemicals. Wear protective gear if needed. Regular cleaning is important, but periodically deep cleaning as well.
Smith et al.’s 2018 study in the Journal of Applied Microbiology showed the importance of thorough cleaning and disinfection in controlling microbial contamination. Cleaning reduces infection risk in healthcare and food processing areas.
By properly cleaning and decontaminating, you create a healthier and safer environment for everyone. This step ensures a clean and contaminant-free surface for any task.
Repairing Cracks and Holes
Preparing the floor correctly is essential. Repairing cracks and holes is a key step in the process. Here’s a 3-step guide to help:
- Clean the damaged area. Use a brush or vacuum to get rid of loose dirt and debris. This allows the repair material to stick.
- Apply a patching compound. Choose one based on your floor type. Mix it as the manufacturer directs. Then, spread it over the crack or hole with a putty knife. Make sure it’s level.
- Sand and finish. Once the compound dries, sandpaper any roughness. Clean the area again afterward. Then, apply a finish like paint or varnish to match your floor.
Remember these additional details:
- Check for moisture before applying the patching compound.
- For bigger cracks or deeper holes, you may need to repeat the filling process.
- For large-scale repairs, seek professional help.
Did you know? Repairing cracks and holes can extend your floor’s lifespan. It also prevents further damage and reduces tripping hazards.

Applying Primer
To achieve a successful application of primer in DIY epoxy flooring, you need to understand its importance and follow the necessary steps.

Mixing and Applying Epoxy Resin
To achieve seamless epoxy flooring, follow these steps for mixing and applying epoxy resin. Choose the right epoxy resin for your project, mix it correctly, and apply it evenly to the floor.
Choosing the Right Epoxy Resin
Carefully consider various factors when choosing the right epoxy resin. Think about the surface being coated, the desired durability, and the required curing time. For an informed decision, compare different epoxy resins based on key properties in the table below:
| Epoxy Resin | Surface Compatibility | Durability | Curing Time |
|---|---|---|---|
| Resin A | Wood, Concrete | High | Fast |
| Resin B | Metal | Medium | Moderate |
| Resin C | Glass | Low | Slow |
Choose the right option from the table to get optimal results. Also, take into account factors such as temperature resistance, UV stability, and chemical resistance. These properties may be crucial for your application.
Did you know epoxy resin was first used in aircraft construction during World War II? Its strength and ability to stick to surfaces made it ideal for lightweight yet tough aircraft components. Nowadays, epoxy resin is used in many industries due to its versatility and dependability.
Steps to Mixing Epoxy Resin
Mixing epoxy resin needs careful steps to guarantee a good result. Adhering to the correct process will ensure you get the desired outcome for your project. Here’s a step-by-step guide:
- Measure Resin & Hardener: Figure out the ratio of resin to hardener from the packaging. Use a digital scale to accurately measure both components. The ratio must be exact to guarantee a proper cure.
- Mix Well: Pour the measured resin & hardener into a clean mixing container. Using a stir stick or paddle, stir the two components together gently. Make sure to scrape the sides and bottom of the container to mix all of the components thoroughly.
- Avoid Air Bubbles: After mixing, let the epoxy rest for a few minutes. This allows any air bubbles that formed during mixing to rise up and pop on their own. Avoid using too much force to get rid of bubbles as it can introduce more air into the mixture.
- Use Within Pot Life: Epoxy has a limited working time known as pot life, where it stays liquid and workable. Check the packaging for the exact pot life instructions and make sure to finish your project before the time runs out.
Also, different epoxy resins may have special instructions or considerations unique to their formulation or intended use. Always refer to the manufacturer’s guidelines for the best results.
Epoxy resin has been used in many applications – from boat building to art projects and industrial coatings. Its versatility & durability have made it a top pick among professionals and DIYers. Epoxy resin technology continues to develop today, with improvements allowing for better performance & application methods in various industries.

Applying Epoxy Resin to the Floor
Applying epoxy resin to the floor needs precision. To do it well, follow these steps:
- Clean the floor. Sweep and vacuum to remove dirt and debris that may interfere with the resin’s adhesion.
- Prepare the surface. Use a concrete grinder to smooth out rough areas and imperfections. Fill in cracks and holes with epoxy filler and let it dry.
- Mix the epoxy resin. Follow the manufacturer’s instructions. Use a mixing stick or a drill paddle attachment for an even consistency.
- Apply the primer coat. Roll or brush a thin layer of epoxy primer onto the entire floor. This will help the resin bond well with the floor.
- Pour and spread the resin. Pour the resin onto one section of the floor. Spread it evenly with a squeegee or roller. Do it in small sections without pooling or thick spots.
- Remove air bubbles. Use a heat gun or propane torch to pass over the freshly poured resin. This releases trapped air for a smooth finish.
Professional advice is needed for extra tips and tricks. And remember to ventilate during application and wait until the resin has cured before walking on it.
Make your dull floor stunning! Take action and apply epoxy resin today!

Adding Decorative Elements (Optional)
To enhance the aesthetic appeal of your DIY epoxy flooring, consider adding decorative elements. Using metallic pigments or flakes, as well as incorporating patterns or designs, can elevate the visual impact of your flooring. These sub-sections offer solutions to infuse creativity and personal style into your epoxy flooring project.
Using Metallic Pigments or Flakes
The table displays different metallic pigments or flakes for decoration.
| Pigment or Flake | Description |
|---|---|
| Aluminum | Gives brilliant silver effect and good coverage. |
| Copper | Offers warm reddish-brown color and depth. |
| Gold | Creates a rich, opulent gold look. |
| Silver | Provides a sleek, modern silver finish. |
| Bronze flakes | Provide a unique, antique look. |
| Pearl white flakes | Add a shimmery, elegant white. |
Others exist in the market for special designs.
Mixing pigments or flakes creates new looks.
Pro Tip: Prep the surface before applying by cleaning and priming. This allows better adhesion and longer-lasting decorative elements.

Incorporating Patterns or Designs
When thinking of designs and patterns to add, there are other elements to consider. For example, throw pillows with unique patterns can liven up a couch. Also, patterned rugs on bare floors can bring both warmth and style.

Curing and Finishing the Floor
To achieve well-cured and finished epoxy flooring, ensuring sufficient curing time and applying a topcoat for enhanced durability is crucial. Allow the epoxy to cure adequately before proceeding with the next steps. The use of a topcoat will provide added protection and strength to your epoxy flooring.
Allowing Sufficient Curing Time
- Prepare the area – get rid of any obstructions and ensure a neat workspace.
- Verify dryness – use a moisture meter to check if the concrete is dry enough for curing.
- Safety measures – close off the area from traffic to avoid any harm.
- Create great conditions – keep a stable temperature and humidity level during the curing.
- Wait patiently – give ample time for the floor to cure according to the manufacturer’s instructions.
- Post-curing attention – when cured, clean and maintain the floor routinely to keep its look.
Also, be aware that the right curing time may differ depending on things such as climate and the type of flooring material utilized.
Applying Topcoat for Enhanced Durability
For durable floors, a topcoat is a must! This layer adds strength and makes it tougher against wear and tear. Here’s what to do:
- Sweep or vacuum dirt, dust, or debris.
- Mix the topcoat product, if needed, as per instructions.
- Use a brush or roller to apply it evenly. Start from one corner and exit at another.
- Apply thin, even layers to avoid drips or bubbles.
- Wait for each coat to dry before adding more.
- Let the floor cure for 24 hours after all coats are applied.
Remember to check for compatibility between the topcoat and flooring material. Ancient civilizations used natural oils from plants and animals as early forms of floor protection. But modern topcoats provide more durability and longevity!

Maintenance and Long-term Care
To effectively maintain and care for your epoxy flooring, this section will provide solutions for cleaning and maintaining the flooring, as well as dealing with any scratches or damage that may occur.
Cleaning and Maintaining Epoxy Flooring
Cleaning and maintaining epoxy flooring is key to its life and look. Regular upkeep preserves the smoothness and gleam while stopping debris buildup or spots. Here are 5 steps for keeping your epoxy flooring in tip-top shape:
- Sweep or vacuum often to remove loose dirt, dust, and debris. This stops scratching when you move around or put objects on it.
- Use a soft-bristle brush or mop to mix a mild detergent with warm water in a bucket and clean the floor evenly. No abrasive cleaners or brushes; can damage the epoxy coating.
- Rinse the floor properly with clean water to get rid of any soap residue. Leftover residue can make the surface slippery and dull its shine.
- For tough stains, e.g. oil or grease, use a degreaser made specially for epoxy flooring. Apply directly onto the stain, leave it for a few minutes, then scrub gently with a brush before rinsing off.
- Dry the floor totally after cleaning to avoid water spots or streaks from forming. Ventilate if needed to quicken the drying process.
Here are other tips for cleaning and looking after epoxy flooring:
- Don’t use bleach-based cleaners; they can discolor or damage the epoxy coating.
- Put protective mats at entryways to trap dirt and moisture before they reach the floor.
- Wipe up spills fast to prevent stains from setting in.
- Use ice cubes to harden gum or adhesive residue, then gently scrape it off.
By following these suggestions, you can keep your epoxy flooring looking and feeling great:
- Clean it often to remove abrasive particles that could lead to wear and tear.
- Use mild detergents instead of harsh chemicals to keep the epoxy coating safe.
- Properly drying the floors after cleaning stops watermarks and keeps them shiny.
By following these tricks, your epoxy flooring will remain in excellent condition for years to come.
Explore: How To Clean Outdoor Resin Floor
Dealing with Scratches or Damage
Got a scratch or damage on your treasured item? No worries! Simply:
- Assess the severity
- Gather the tools
- Clean the area
- Repair minor scratches
- Seek professional help for extensive damage
Conclusion
DIY epoxy flooring is definitely an option for homeowners wishing to spruce up their floors. Follow the steps and you can get a stunning, durable epoxy floor.
- Mix the epoxy and hardener carefully. This guarantees even application. And remember to apply it in thin coats for better adhesion and a better finish.
- Don’t forget to select the right epoxy for the right area. For high-traffic areas, you need something more durable and abrasion-resistant. Get this right and your floor will look good and last long.


