Have you ever wondered how to give your walls a smooth and polished finish? Plastering is the answer!
In this comprehensive guide, we will explore the art of plastering, from the tools and materials needed to the different types of plaster available.
Learn how to prepare your walls, mix and apply plaster, and achieve a professional finish.
Whether you’re a DIY enthusiast or looking to improve your home, this article will provide you with all the information you need to master the art of plastering.
What is Plastering?
Plastering is the process of applying a smooth coat of plaster mix to a surface, commonly done by professional plasterers to enhance the appearance and durability of walls.
Plastering plays a crucial role in not only improving the aesthetics of a space but also in providing structural support and protection to the walls. Professional plasterers possess a specialized skill set that allows them to expertly apply plaster in a way that ensures a flawless finish and long-lasting results. They are well-versed in various techniques such as float and set, skimming, and rendering, each serving a specific purpose in achieving the desired wall texture and finish.
Why is Plastering Necessary?
Plastering is necessary to protect walls from moisture damage, prevent expensive repairs, and add a finishing touch to new construction projects.
Plastering acts as a shield, creating a barrier that shields the walls from water intrusion, which can lead to structural issues over time. It also helps in maintaining the integrity of the walls, reducing the risk of cracks and deterioration, which can be costly to fix.
The aesthetic value of well-done plastering cannot be overlooked. It gives a polished look to the walls, enhancing the overall appeal of the space. Whether it’s a residential building, commercial establishment, or historical renovation project, proper plastering plays a crucial role in the longevity and visual appeal of the structure.
What are the Benefits of Plastering a Wall?
Plastering a wall offers benefits such as creating a smooth and durable surface, enhancing the overall appearance, and providing a protective coat against environmental elements.
One of the key advantages of wall plastering is the aesthetic transformation it brings. Through the application of plaster, imperfections on the surface are concealed, resulting in a seamless and pristine finish. This enhanced appearance not only adds value to the space but also gives it a more polished and sophisticated look.
The protective qualities of plaster cannot be overlooked. Plaster acts as a shield, safeguarding the underlying structure from moisture, temperature changes, and wear and tear. By effectively sealing the surface, plaster helps to prolong the life of the wall and maintain its integrity over time.
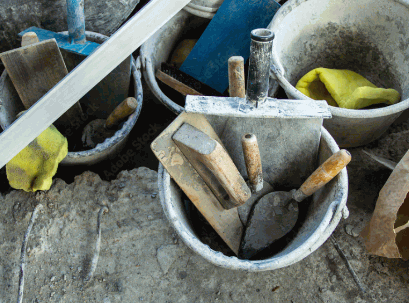
What Tools and Materials are Needed for Plastering?
To commence plastering, essential tools such as a plaster hawk, trowel, plastering float, and a paddle attachment for mixing are required.
Plaster hawk: A plaster hawk is used to hold the plaster or mortar mix while it is being applied to the surface, providing easy access for the plasterer. The hawk allows for quick and efficient application, reducing fatigue during extended work periods.
Trowel: The trowel is essential for spreading and smoothing the plaster evenly across the surface. It helps in achieving a consistent finish, ensuring that the plaster is properly applied without any lumps or gaps.
Plastering float: A plastering float is used for finishing touches, such as smoothing out rough areas and creating a polished surface. It is particularly useful for achieving a professional-looking result.
Paddle attachment: The paddle attachment is crucial for mixing plaster or mortar thoroughly. It ensures that the consistency of the mix is just right for application, saving time and effort in the long run.
What are the Different Types of Plaster?
There are various types of plaster, including traditional plaster, stucco for exterior walls, white cement for interior fixes, and quick fixes for rapid repairs.
Traditional plaster is a versatile option that provides a timeless aesthetic and is suitable for both interior and exterior applications.
Stucco, on the other hand, is specifically designed for external walls, offering durability and weather resistance.
White cement is perfect for achieving a smooth and clean finish on interior walls, adding a modern touch to any space.
Quick fix, as the name suggests, are ideal for quick and easy repairs, making it a popular choice for patching up minor damages efficiently.
How to Prepare the Wall for Plastering?
Preparing a wall for plastering involves cleaning the surface, repairing any damage, and applying a bonding agent to ensure the plaster adheres correctly.
To start the process, begin by thoroughly cleaning the wall to remove any dirt, dust, or loose particles. This can be done using a brush, vacuum, or a damp cloth, depending on the extent of the buildup. Next, inspect the wall for any cracks, holes, or uneven areas that may need repair. Using a suitable filler or patching compound, fill in these imperfections and allow them to dry completely before moving on to the next step.
Once the wall is clean and repaired, the crucial step of applying a bonding agent comes into play. This agent helps create a strong connection between the plaster and the wall surface, ensuring durability and longevity. Follow the manufacturer’s instructions carefully when applying the bonding agent, allowing it to dry fully before starting the plastering process.
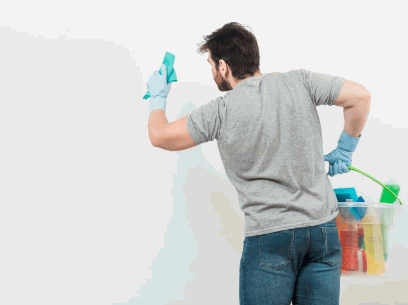
Clean the Wall
Before plastering, ensure the wall surface is free from debris, dust, and any previous plaster job residues.
To properly clean the wall surface before plastering, start by removing any loose debris such as dirt, old paint chips, or flaking plaster. Use a stiff brush or a scraper to effectively dislodge and sweep away these particles.
Next, focus on eliminating dust by wiping down the area with a damp cloth or sponge. This step is crucial to ensure that the plaster adheres properly without any hindrances. Check for any residues from previous plaster work and scrape them off to create a smooth canvas for the new plaster application.
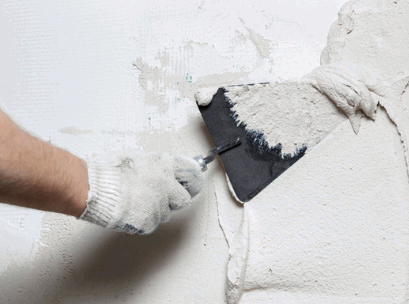
Repair Any Damage
Inspect the wall for any damages, such as cracks, holes, or alterations, and repair them using suitable materials to ensure a smooth plastering process.
Common issues to look out for include large cracks that could indicate structural problems, small holes from nails or screws, or uneven surfaces that need leveling.
When repairing cracks, be sure to fill them with flexible filler to prevent future cracking.
For holes, use spackling compound for smaller ones and plaster for larger areas.
It’s crucial to address these issues before plastering to maintain the integrity of the surface and achieve a flawless finish.
Apply a Bonding Agent
Applying a bonding agent to the wall surface enhances the adhesion of the plaster, ensuring a strong bond and a durable finish.
Before plastering, it is crucial to prepare the wall properly to achieve a long-lasting and flawless result. The bonding agent acts as a key intermediary layer that promotes a secure connection between the substrate and the plaster material. Its application involves cleaning the surface thoroughly to remove any dust or debris, followed by evenly applying the bonding agent using a brush or roller.
One of the primary benefits of using a bonding agent is the improved adhesion it provides, which prevents the plaster from peeling off or detaching over time. By creating a stable foundation, the bonding agent allows the plaster to adhere smoothly and uniformly, eliminating the risk of unsightly gaps or cracks.
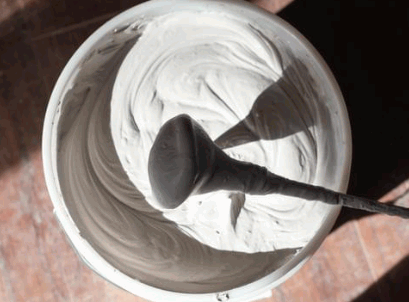
How to Mix Plaster?
Mixing plaster involves measuring the water and plaster accurately, using a stirrer or electric drill with a paddle attachment for thorough mixing.
Begin by measuring out the required amount of water based on the instructions provided on the plaster packaging. This step is crucial as the correct water-to-plaster ratio is essential for the mixture to be set properly.
Next, slowly add the measured plaster to the water in a clean mixing container to prevent lumps. Use a stirrer or electric drill with a paddle attachment to mix the components thoroughly. Consistency is key, so continue mixing until the plaster is smooth and free of clumps.
Pour the mixed plaster into your desired mold or surface, tapping it gently to release any air bubbles and allow it to set.
Measuring the Water and Plaster
Begin by measuring the required amount of cool water and plaster mix, ensuring the proportions are accurate for the desired consistency.
When starting the process of mixing plaster, it is crucial to follow the instructions meticulously to ensure the final outcome is of high quality. One key aspect to bear in mind is that the water should be cool in temperature, as using warm water can lead to the premature setting of the plaster, resulting in a less workable mix.
The accuracy of the proportions plays a significant role in the overall result. Whether it is a small craft project or a larger construction job, missing even a slight measurement can cause the mix to be too thick or too runny.
By paying attention to these details and taking the time to measure the water and plaster mix precisely, you can ensure that your project proceeds smoothly and that the consistency of the plaster meets your expectations.
Learn more: Which Type Of Cement Is Best For Plastering
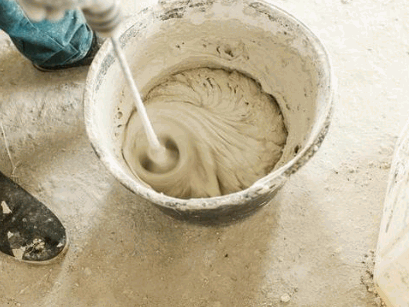
Mixing the Plaster
Mix the plaster using a stirring rod or an electric drill with a paddle attachment until all dry plaster particles are fully incorporated and the mixture is smooth.
Proper mixing of plaster is crucial to ensure uniform consistency and optimal performance. When blending the plaster materials, it’s essential to follow a systematic approach for the best results.
Start by adding the dry plaster to the water in a gradual and steady manner, avoiding clumping. Stir the mixture in a circular motion, making sure to reach all corners of the container to prevent any pockets of dry plaster.
For larger quantities, using an electric drill with a paddle attachment can save time and energy, but it’s important to maintain a moderate speed to prevent overmixing, which can lead to air bubbles in the mixture.
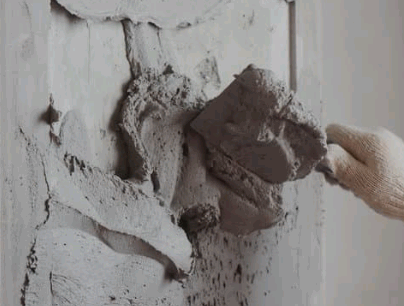
How to Apply the First Coat of Plaster?
Applying the first coat of plaster involves wetting the wall surface, then spreading and smoothing the plaster mixture evenly for a consistent application.
Before starting the plaster application process, make sure the wall surface is clean and free of any dust or debris. Next, prepare the plaster mixture as per the manufacturer’s instructions, ensuring the right water-to-plaster ratio for optimal consistency.
Begin by loading the plaster onto the hawk using a trowel, then apply it onto the wall in an upward motion, starting from the bottom and working your way up. Use broad, sweeping strokes to spread the plaster evenly, covering any imperfections or gaps on the wall.
Once the plaster is spread, use a plasterer’s float to smooth out the surface, applying gentle pressure to create a uniform finish. Work in small sections at a time to maintain control and achieve a seamless result.
Wet the Wall
Before applying the first coat of plaster, ensure the wall is dampened adequately to promote adhesion and smooth application using a plastering float.
Wetting the wall before plastering is crucial as it helps in creating the ideal surface for the plaster to adhere to. The moisture in the wall prevents it from absorbing water from the plaster too quickly, which can lead to a weak bond and cracking.
The wall should be damp, but not excessively wet, with a level of dampness that is equivalent to a squeezed-out sponge. This ensures that the plastering process goes smoothly, allowing the plaster to set properly and bond effectively with the wall.
A plastering float plays a vital role in this process by helping to spread the plaster evenly and smoothly across the dampened surface, ensuring a uniform finish. It also helps in compacting the plaster and removing excess material for a neat and professional result.
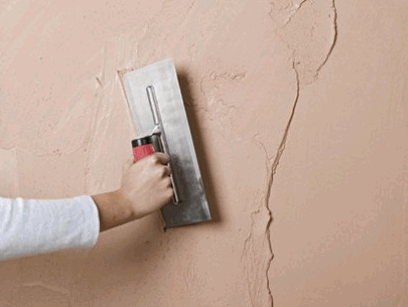
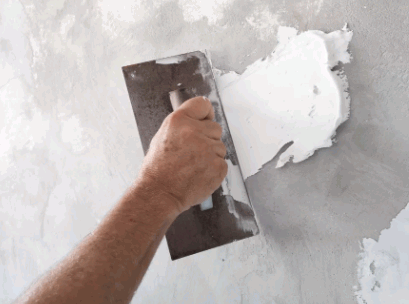
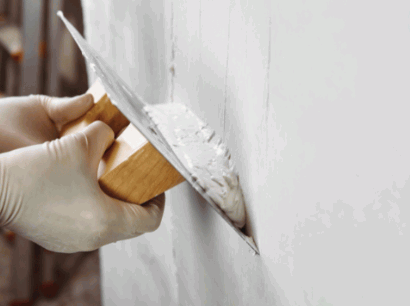
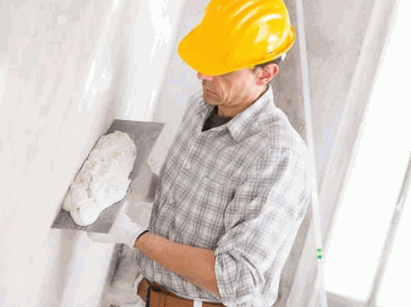
Apply the Plaster
Apply the plaster mixture to the wall surface using a flat steel trowel, spreading it evenly and working in sections to achieve a consistent thickness.
When applying the plaster with a flat steel trowel, remember to maintain a smooth and steady motion to ensure uniform spread. By breaking down the wall into manageable sections, you can focus on one area at a time, allowing for better control and a neater finish. This method not only helps in achieving an even coating but also makes it easier to monitor the thickness and coverage as you progress.
How to Apply the Second Coat of Plaster?
Applying the second coat of plaster involves wetting the first coat, then applying a new layer of plaster mix to further smoothen and strengthen the wall surface.
Before beginning the application of the second coat of plaster, it is crucial to ensure that the surface of the first coat is dampened adequately. This step helps the new layer of plaster adhere effectively to the existing surface. Once the dampening process is completed, the next step involves carefully applying the second coat of plaster using smooth and steady motions to achieve a uniform finish.
Layering the plaster is essential not only for aesthetic purposes but also for enhancing the durability and resilience of the wall. Each coat adds strength and thickness, ultimately resulting in a sturdy and refined surface. By following proper techniques and allowing each layer to set and dry appropriately, you can achieve a professional-quality plaster finish that will stand the test of time.
Wet the First Coat
Before adding the second coat, ensure the first coat is lightly wetted to enhance bonding and adhesion for the subsequent layer, using a wood paint stirrer for even dampness.
By lightly wetting the first coat, the surface becomes receptive to the second layer of paint, allowing for a stronger bond between the layers. This process not only improves adhesion but also helps prevent peeling or flaking of the paint over time.
To achieve optimal dampness, dampen a clean cloth with water and gently wipe over the painted surface, ensuring it is uniformly moist but not overly saturated. The use of a wood paint stirrer ensures consistent wetting across the entire area, guaranteeing a smooth and uniform application of the next coat.
Apply the Second Coat
Apply the second coat of plaster evenly to the wall, ensuring the thickness is sufficient for a smooth and durable finish.
When applying the second coat of plaster, it is crucial to maintain a consistent thickness throughout the entire surface. A common mistake is to vary the thickness, leading to an uneven finish. To achieve a professional look, use a hawk and trowel technique for a smooth application. Ensuring that the plaster is spread evenly will prevent visible lines or ridges. Working in small sections at a time can help maintain control over the thickness and coverage. Remember to blend each section smoothly into the previous one to create a seamless result.
How to Finish and Smooth the Plaster?
Finishing and smoothing the plaster involves using a trowel to refine the surface, sanding any imperfections, and applying a final coat for a polished appearance.
In terms of trowel usage, it’s essential to hold the tool at a slight angle to the surface, applying even pressure for a smooth finish. Sanding techniques play a crucial role in achieving a flawless result; starting with coarse grit sandpaper and progressing to finer grits to ensure a seamless surface. The final coat application requires precision and finesse, with attention to detail to cover any remaining blemishes and achieve that desired refined aesthetic.
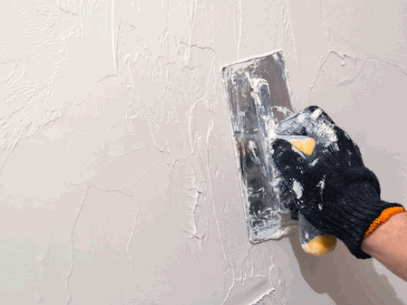
Trowel the Surface
Using a trowel, smooth out the plaster surface by making gentle strokes, ensuring an even and uniform finish for a professional plastering result.
When applying plaster, it’s crucial to maintain consistent pressure and angle on the trowel to avoid creating uneven surfaces. A key technique is to use a slight circular motion while gliding the trowel across the plaster, smoothing out any bumps or imperfections. By mastering these stroke techniques, you can achieve a seamless finish that enhances the aesthetic appeal of the wall or ceiling. Remember, the trowel is your primary tool in the plastering process, dictating the final outcome of the surface, so handle it with precision and care.
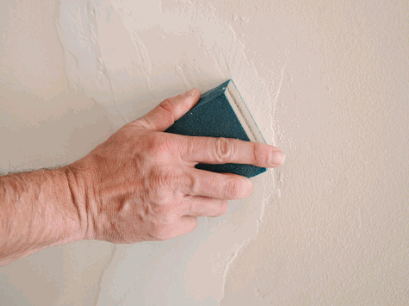
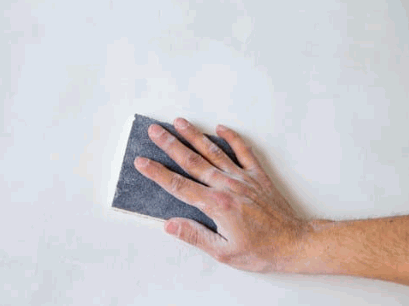
Sand the Plaster
After the plaster dries, carefully sand the surface to eliminate any rough spots or imperfections, ensuring a smooth and polished final result.
Sanding plaster is a crucial step in the process of achieving a flawless finish on your walls or ceilings. This post-drying stage allows you to refine the surface, creating a uniform texture that enhances the overall appearance of the room.
By using the right sanding techniques, such as feathering edges and circular motions, you can effectively smooth out any lumps or bumps that may have formed during the application of the plaster. This meticulous attention to detail ensures that when the fresh coat of paint is applied, it adheres evenly and beautifully, without highlighting any underlying imperfections.
Apply a Final Coat of Plaster
For the last step, apply a final coat of plaster to the surface, ensuring uniform coverage and a consistent texture across the walls.
When applying the final coat of plaster, it is crucial to maintain a steady hand and work methodically to achieve an even application. This final layer plays a vital role in concealing any imperfections and irregularities, creating a smooth and polished surface. By spreading the plaster evenly and using the appropriate tools, you can ensure that the texture remains consistent throughout. This step not only enhances the aesthetic appeal of the walls but also adds durability and strength to the overall finish. It is the finishing touch that transforms a rough surface into a professional masterpiece.
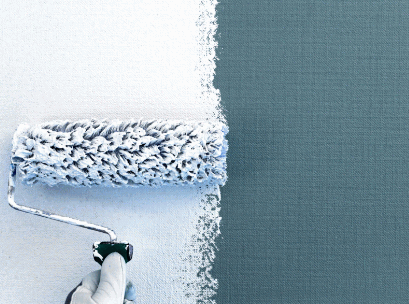
How to Paint or Wallpaper over Plaster?
To paint or wallpaper over plaster, ensure the surface is clean and dry, then apply a primer before adding paint or wallpaper for a seamless and lasting finish.
Begin by thoroughly inspecting the plastered surface for any cracks, holes, or imperfections that need to be filled and smoothed out. Use a suitable filler compound or spackling paste to repair any damaged areas, ensuring a uniform surface.
Once the repairs are complete, it is essential to sand the entire surface to promote better adhesion. Use fine-grit sandpaper to smooth out rough spots and create a slightly rough texture for the primer to grip onto.
Next, apply a high-quality primer specifically designed for plaster surfaces. This will help seal the surface, promote better paint adhesion, and prevent the plaster from absorbing too much of the paint or wallpaper adhesive.